In this article, you will learn how to :
Step 1: Configure the Registration Type
Step 2: Create your attendee types
Step 3: Understand the Attendee Journey
Step 4: Understand the post-registration behavior
Before You Start
The Group Tickets feature is not enabled by default on Eventtia accounts. This is an additional feature that needs to be estimated by Eventtia Sales or Customer Success Team.
Once quoted, you must contact our helpdesk at help@eventtia.com and request the activation of the Registration type option. Once the activation is confirmed, the option will become available in your event Settings.
Step 1: Configure the Registration Type
-
Go to your event Settings .
-
Under the Registration Type section, select: Appointment booking

This option is mandatory to use the Slot-based group booking feature.
Once selected, you can proceed with the standard event setup, including:
- Event details
- Attendee types
- Registration forms
- Automated messages
Since this configuration combines group registrations with slot booking, additional settings are required.
Step 2: Create your attendee types
a. Create Your Attendee Types
You will need to create two attendee types:
- General
- Plus One

b. Configure the “General” Attendee Type
The General attendee type is the main profile used during the registration process. For this attendee type, configure:
- Registration form
- Automated messages
- Group registration settings

-
Use the following variable in the welcome email to display all booked tickets:
${group_tickets_info_readonly}
This variable automatically displays the list of tickets booked during the registration.
c. Configure the “Plus One” Attendee Type
Note: The Plus One attendee type is only used to create additional registrations linked to the primary attendee. The registration form and automated messages configured for this attendee type will not be used.
For this attendee type, make sure to:
- Deactivate public registration
- Deactivate automated emails (welcome email)
- Allow multiple registrations with the same email address (from the email field of the form)
Note 2: The Plus One form should be exactly the same as the Guest form, except that the field should not be "Required" nor "Available in public listing" to avoid any error when saving the form.
d. Create Slots from the "Program" Module
-
Go to the Program module.
You can:
- Create one activity
- Add or import multiple sessions under this activity
These sessions will become the available booking slots displayed during registration.

If needed, refer to the dedicated article about creating activities and sessions.
e. Configure the Minimum and Maximum Number of Tickets
The minimum and maximum number of tickets allowed per registration can be configured in the General Settings of the event.

Note: The minimum and maximum ticket configuration may not be visible by default.
This setting becomes available once the registration page URL has been activated by the Eventtia technical team.
f. Request the Registration Page URL Activation
Once your Slot-based group booking configuration is completed (attendee types, forms, slots, and settings), the registration page URL must be activated by the Eventtia technical team before it can be shared with attendees.
Unlike a standard Eventtia website page, the Slot-based group booking registration page is hosted through a dedicated external application and does not automatically generate a public URL from the Website module.
To request the activation of the registration page URL, contact your Account Manager or the Eventtia support team with your event details.
Once activated, a dedicated registration URL will be created and shared with you for testing and participant access.
Step 3: Understand the Attendee Journey
Once the Slot-based group booking registration page is ready and published, attendees can complete their registration through the following steps.
a. Select the Number of Tickets
The first step is to select how many tickets should be booked. The maximum number of tickets available depends on:
- The event General Settings
- The attendee type workshop limitations
Attendees can increase the quantity using the Plus (+) button under the Quantity field.

For paid attendee types, the total amount to pay is automatically displayed below the ticket selection area.
-
Once the quantity is selected, click on Continue to proceed.
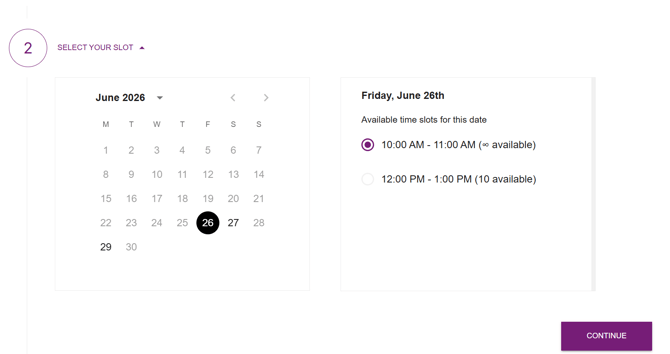
b. Pick a Slot
Attendees will then see all available event dates based on the number of tickets selected previously. After selecting a date, the available time slots for that day will appear.
-
Click on Continue to proceed.
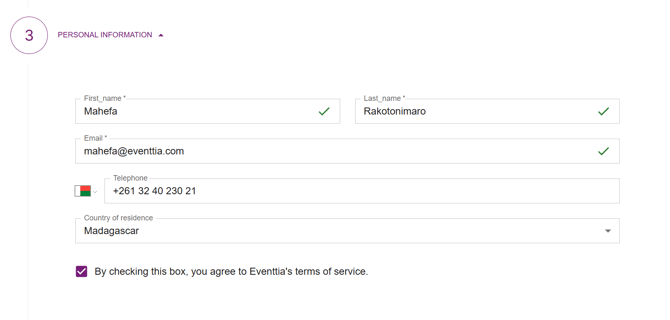
c. Fill in Personal Information
Attendees must complete the registration form. The displayed fields depend on the registration form configured for the attendee type in Eventtia.
-
Once completed, click on Continue to move to the next step.
d. Complete the Payment (For Paid Events)
For paid events, attendees will see a payment summary showing the total amount due for all booked tickets.
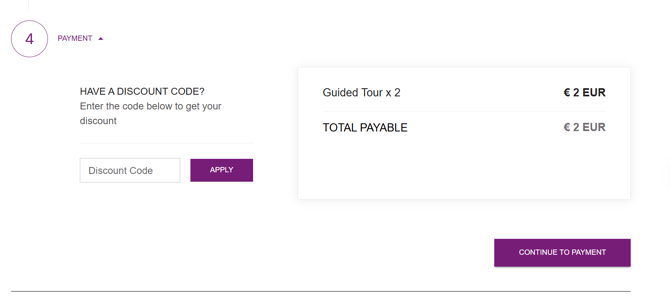
Once the payment is completed, the registration is confirmed.
Step 4: Understand the post-registration behavior
After registration (or payment), attendees receive a welcome email.
This email contains:
- The registration confirmation
- The list of booked tickets
- Individual QR codes for each ticket


Attendees can also:
- Modify their registration
- Cancel their registration
Note : The modification or cancellation is individual, you cannot book the entire registration at once.