Part 1: Understanding the event Dashboard and Menu
- The first thing you need to do is go to your phone's application store and download the "Eventtia On-site" application.

- Then, log in to the application with your Eventtia user credentials.


- Once logged in, you will see the current events:

- Click the More options button (⋮) in the top-right corner to filter by past, current, and future events. Finally, click the logo or name of the event to access it.

- Once you access the event, you will see the event logo, name, and dates. Then, you will find a chart that shows how the event check-in is progressing live.
You can use the "Checked in per day" function to filter attendance by day. If you have activities, you will also find the number of checked-in participants for each one.


At the bottom of the screen, you'll find the tools menu, where you'll find the "Attendees", "Activities", "Checkpoints", and "Settings" options.
-
Attendees: You'll be able to find the complete list of registered participants for the event and search by name or email.

-
Activities: This section displays all the activities available for check-in during the event. You can find them by name or date.


-
Checkpoints: Here, you will find all the checkpoints created for the event and check-in participants.


-
Settings: The application can also be used offline if you don't have an Internet connection. You can synchronize it once you regain internet access.
To activate Offline mode, go to Settings:

- Click "Update info" to enable offline mode. You will see the "Available offline" tag on the event dashboard.


- Once you regain internet access, synchronization will happen automatically, and you can view all synchronized data by clicking "Manage".
-Feb-09-2024-04-01-44-1713-PM.png?width=200&height=404&name=Training%20Materials%20Preparation%20(4)-Feb-09-2024-04-01-44-1713-PM.png)
- Click "Update info" to enable offline mode. You will see the "Available offline" tag on the event dashboard.
Part 2: How to Register Attendees Through the App
-
At the bottom of the screen, you'll find the Tools menu. Click the "Attendees" option.

-
Then, click the More options button (⋮) and select "New Attendee".


You can also use this section to sort attendees alphabetically, by newest or oldest, and filter by Checked-in or Check-in Pending.
-
Fill in the participant registration form.

-
Once completed, hit "Save" to confirm the participant's registration.
-
You can go back and edit a participant's information by clicking their name and selecting the "Save" button at the bottom of the registration form.
Part 3: Check-in your attendees with app
-
You can access the list of participants to check in from the "Dashboard", "Attendees", "Activities", or "Checkpoints" menu. In all of these sections, you can scan participants' QR codes using the green camera icon.


Dashboard Attendees Activities Checkpoints
-
Point your camera toward the QR code as shown below:
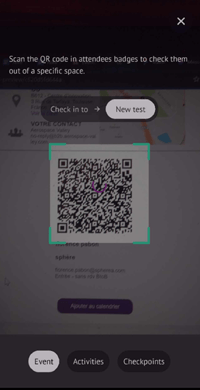
-
If the QR code is correct and corresponds to the event, you will see a green message: "Attendee checked-in". If the QR code is incorrect, you will see a red message with an error.
.png?width=196&height=378&name=Training%20Materials%20Preparation%20(4).png)
-1.png?width=187&height=380&name=Training%20Materials%20Preparation%20(4)-1.png)
- At the bottom of the interface, you can choose whether to scan participants by activity. To view the list of activities, click on "Activities." Alternatively, you can select "Scan and let me choose," which allows you to scan a participant's QR code, check them into the event, and register their attendance for any activities they signed up for.


-
To check participants into Checkpoints, click the "Checkpoints" option and choose between Check-in or Check-out at the checkpoint.


Choose the option Click the checkpoint Check-in Check-out -
You can also check in a participant manually by swiping right on their name.

-
Once correctly checked in, the participant's status will switch from "Check-in Pending" to "Checked-in".

