This section allows you to:
- Enable registration recovery
- Override your event website's URL
- Enable unpaid attendees deletion
- Enable draft registration
- Enable Recaptcha security verification
- Customize the registration form with CSS and JS
- Change the titles on the registration form
- Choose printer
- Email Domains whitelist
- Payments
To access these settings, go to the "Registration" module, then to "Advanced Settings".

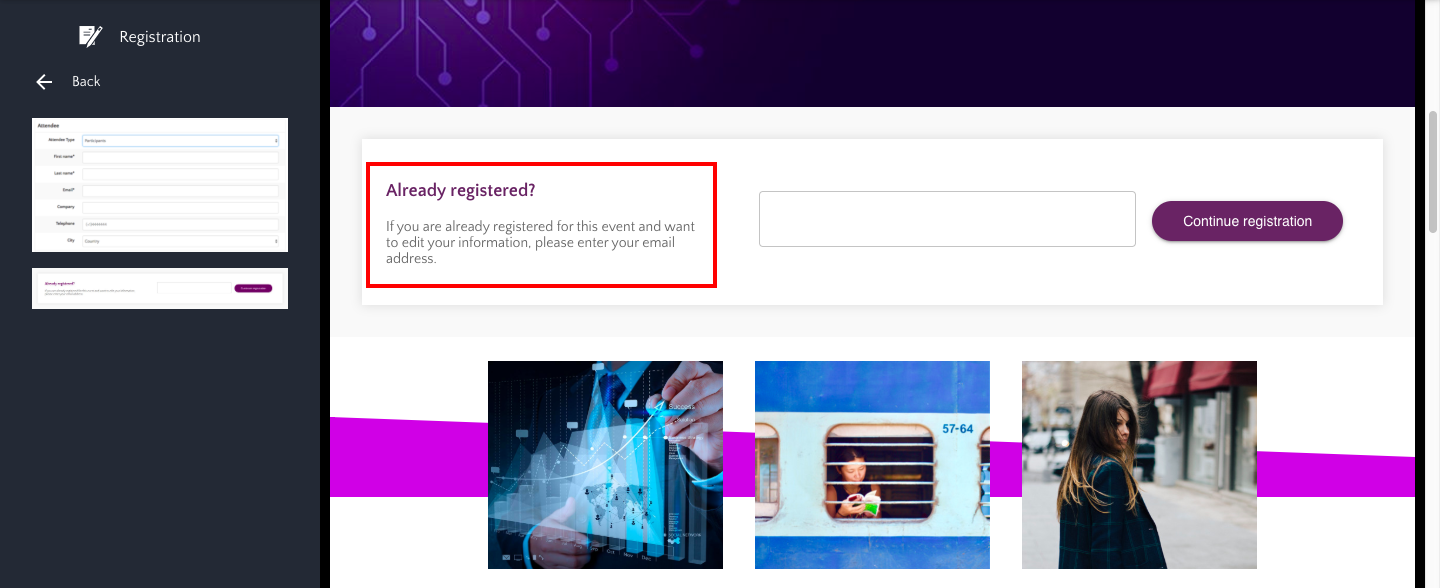
1. Registration Recovery
- This option allows attendees to modify their registration information when they have already registered for your event.
- It also lets an attendee who registered for a previous event of yours, but has not yet registered for this particular event, immediately retrieve their previously entered registration information.

2. Override your event website's URL
- This option allows you to create a custom URL for your event website, rather than using the default one created by Eventtia.
- Rather than the default URL (e.g. 'live.eventtia.com/en/...'), you can use your own URL.
- For example, if we change the URL to 'eventtiatestingsite.com', your attendees will be taken to that URL when they click on "Visit event website" in the welcome email.

3. Automatic attendees deletion
- Registered attendees with unpaid registrations will be automatically removed from the event after a specified time if this option is selected. Consequently, their associated workshops, articles, and 1to1 meetings will also be automatically deleted.

4. Enable draft registration
- This option allows attendees' data to be saved even if they do not click save.
- This is very useful for long registration forms, where participants may take a while to complete the form.

5. Enable Recaptcha security verification
-
This option allows you to enable a verification method designed to protect against spam and password decryption. It involves a simple test to confirm that you are a human user and not an automated system attempting to access a password-protected account. Refer to this article for further details. : How to activate the reCaptcha security check on your registration forms?

6. Customize the registration form with CSS and Javascript files
- This option gives you more control over your registration form's appearance, allowing you to change the color, font and layout of the form.
- Select your CSS and/or JS file to upload, then click "Save".

7. Change the titles on your registration form
- This option again gives you more control over the appearance of your registration form.
- Each box corresponds to the section name above it; simply write the title you prefer in the box.
- When you reload your registration form, your changes should be visible.

8. ZEBRA
- Configure your Zebra printer for event badge printing in this section. For detailed instructions, for detailed instructions, please refer to the article How to Print Label-Format Badges with a Zebra Printer.

9. General (Email Domains whitelist)
- This field allows you to restrict event registrations to email addresses from specific domains. For example, if you enter “@company.com”, only users with an email like “john@company.com” will be allowed to register.
It’s a way to ensure that only people from a certain organization or group can access the event.

10. Payments
- This field allows you to redirect users to an external webpage after a successful payment.
- You can use it to send participants to a thank-you page, a confirmation screen, or any other relevant page once their transaction is complete.
