![Logo black transparent background.png]](https://help.eventtia.com/hs-fs/hubfs/Logo%20black%20transparent%20background.png?height=40&name=Logo%20black%20transparent%20background.png)
Prerequisites
Before you begin, make sure you have the following:
- An active PayPal Business account.
- Access to the PayPal Developer Portal to obtain your API credentials (Client ID and Secret Key).
Here's how to connect Eventtia to PayPal: al:
Step 1.
- Log in to your PayPal account Log in with your usual account or a business account at developer.paypal.com.
Step 2.
-
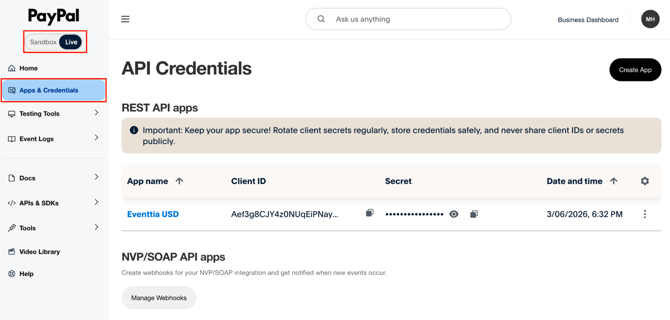
Check the Sandbox/Live mode: In the top-left corner, you'll see a Sandbox/Live toggle.
-
Sandbox: Use this environment to test your integration without processing real payments.
- Live: Use this environment when you're ready to accept real payments.
-
Make sure the correct mode is selected for your needs (for testing, keep Sandbox enabled).
Step 3.
-
Go to "Apps & Credentials"
In the left-hand menu, click Apps & Credentials. You'll find the REST API apps section there.
Step 4.
- Create a new app (if you don't already have one)
If this is your first time, click the black Create App button in the top right. A form will open where you should:
- Give your app a name (e.g., "MyStore").
- Select the account type if prompted.
- Click Create App to confirm.
Step 5
- Retrieve your credentials
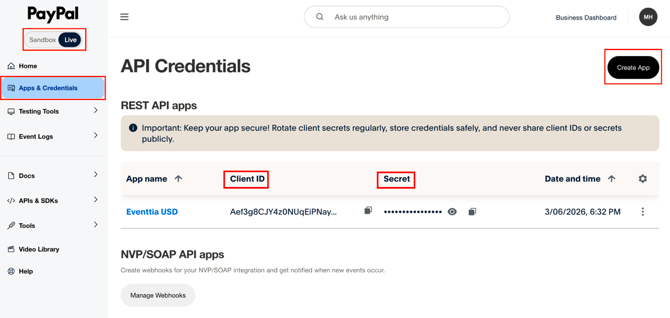
Once the app is created, you'll see a table with:
- App name: he name of your application.
- Client ID: displayed directly as text,click the clipboard icon to copy it.
- Secret: hidden behind dots for security. Click the eye icon to reveal it, or the clipboard icon to copy it without displaying it on screen.
Store your credentials securely
Copy both values and save them somewhere safe (environment variables, a secrets manager, etc.). As the yellow warning on screen indicates: never share your Client ID or Secret publicly, and rotate your secret periodically for security.
How to Configure Your PayPal Credentials in Eventtia
Step 6
- Log in to your Eventtia account and select your event
Sign in with your credentials and choose the event you want to configure payments for.
Step 7
-
Go to "Settings"
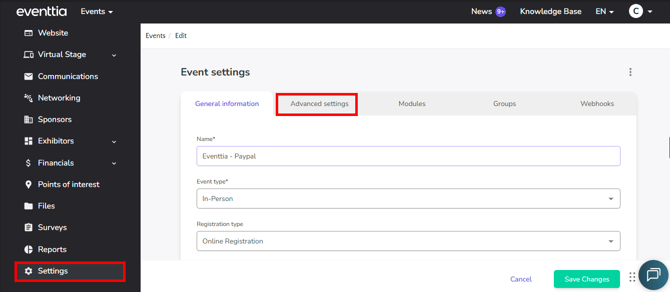
In the left-hand navigation menu, click Settings.
Step 8
- Open "Advanced settings"
On the event settings screen, you'll see several tabs at the top: General information, Advanced settings, Modules, Groups, Webhooks. Click Advanced settings.
Step 9
- Find the payment settings section
Scroll down until you find the Payment provider field and select PayPal from the dropdown menu.
Step 10
-
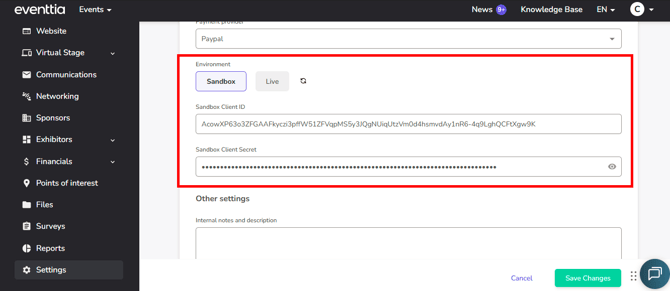
Choose your environment: Sandbox or Live
Just below, you'll see the Environment box with two options: Sandbox and Live.- Select Sandbox if you're still testing.
- Select Live if you're ready to accept real payments.
Step 11
-
Paste in the credentials from your PayPal account
In the fields corresponding to the environment you selected, paste:- Client ID → into the "Sandbox Client ID" field (or "Live Client ID" for production).
- Secret → into the "Sandbox Client Secret" field (or "Live Client Secret").
Step 12
-
Save your changes
Click the green Save Changes button in the bottom-right corner to confirm your configuration.
Advanced Payment Options
PayPal's Expanded Checkout features let your attendees pay with their preferred method, including digital wallets and financing options.
| Payment Method | Description |
| Advanced Credit and Debit Card Payments (ACDC) | Enables secure credit and debit card processing via 3D Secure (3DS) technology. Compatible with Visa Secure, Mastercard Identity Check, Discover ProtectBuy, and American Express SafeKey. |
|
Apple Pay |
Accepts payments through Apple's digital wallet on supported devices. |
| Google Pay | Accepts payments through Google's digital wallet on Android devices and supported browsers. |
Before You Activate: Key Considerations:
1. Regional availability: Advanced Payment Options (including Apple Pay, Google Pay, and Pay Later) aren't available in every country or region.
- Apple Pay: Australia, Austria, Belgium, Bulgaria, Canada, China, Cyprus, Czech Republic, Denmark, Estonia, Finland, France, Germany, Greece, Hong Kong, Hungary, Ireland, Italy, Japan, Latvia, Liechtenstein, Lithuania, Luxembourg, Malta, Netherlands, Norway, Poland, Portugal, Romania, Singapore, Slovakia, Slovenia, Spain, Sweden, United Kingdom, and United States. .
- Google Pay: Australia, Austria, Belgium, Bulgaria, Canada, China, Cyprus, Czech Republic, Denmark, Estonia, Finland, France, Germany, Greece, Hong Kong, Hungary, Ireland, Italy, Japan, Latvia, Liechtenstein, Lithuania, Luxembourg, Malta, Netherlands, Norway, Poland, Portugal, Romania, Singapore, Slovakia, Slovenia, Spain, Sweden, United Kingdom, and United States.
- Pay Later: Australia, France, Germany, Italy, Spain, United Kingdom, and United States.
2. Requires account approval (vetting): These features aren't automatically enabled on standard PayPal Business accounts. Merchants must submit an activation request from their PayPal Business dashboard or contact PayPal support to complete a risk assessment.
3. Apple Pay setup request: Apple Pay requires additional account-level configuration and server-side domain verification. Once approved by PayPal, you'll need to contact Eventtia's support team to complete the final domain association step on your behalf.
Understanding Your PayPal Dashboard Status
When you navigate to Apps & Credentials > [Your App Name] > Payment methods in the PayPal Developer Portal, you may see status messages in the Expanded checkout section similar to these:
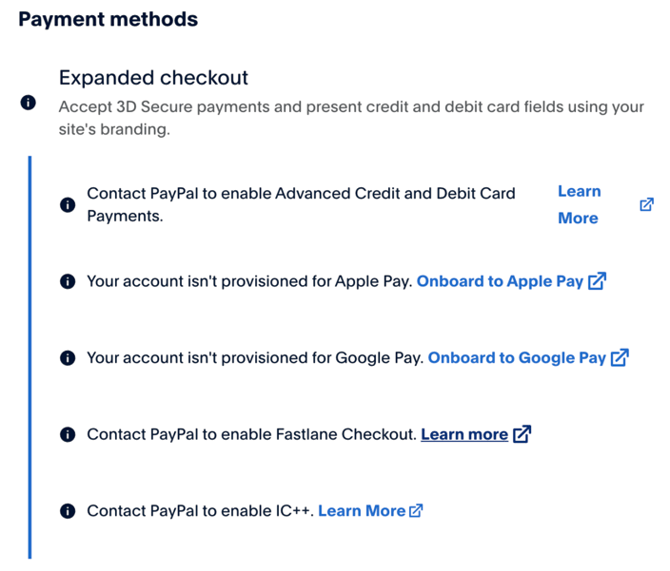
Key takeaway: these messages indicate that the options aren't enabled by default and require an additional onboarding process.
Why do these messages appear? For security, fraud prevention, and regulatory compliance reasons, PayPal does not enable Advanced Payment Options by default on new accounts. Before you can use features like direct card fields, Apple Pay, or Google Pay, PayPal requires your business to complete a mandatory risk assessment and approval (vetting) process.
Once PayPal approves your account, the dashboard updates and you'll see Advanced Credit and Debit Card Payments, Apple Pay, Google Pay, and Fastlane marked with a checkmark, each with its own Manage button.
How to Activate Advanced Credit and Debit Card Payments (ACDC)
Activation steps:
- Verify your account: You'll need a verified PayPal Business account to use this feature.
- Access your settings: From your PayPal dashboard, go to Settings > Payment Methods (or Accept Payments, depending on your account version).
- Submit your activation request: Click Activate to submit your request. PayPal may request additional information about your business during the review process.
- Seamless payment integration: Once your request is approved, your customers will be able to pay with credit or debit cards directly on your checkout page through custom, integrated card fields.
How to Enable Apple Pay
Enabling Apple Pay requires domain verification from Apple to ensure payments are processed securely. Since this setup involves account-level authentication and server configuration, our Eventtia support team will help you complete this step.
Simple 3-step setup :
Step 1: Download the association file from PayPal
Log in to your PayPal Business Portal, go to Apps & Credentials > [Your App Name] > Payment methods, and click Onboard to Apple Pay or Manage.
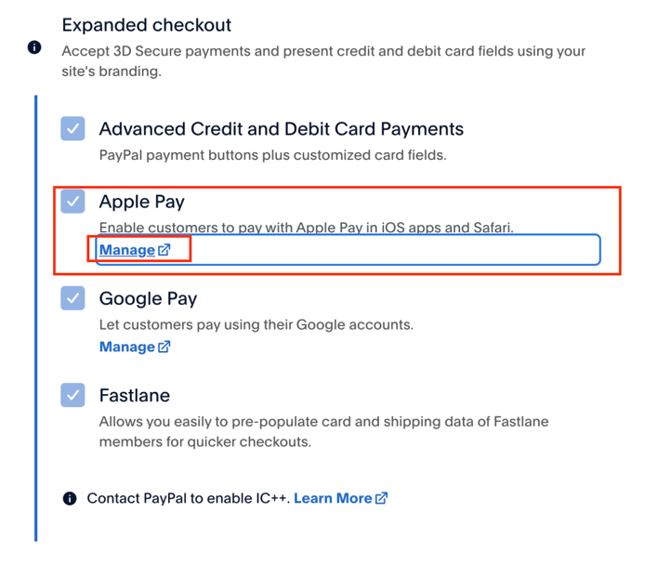
Click Add Domain, enter connect.eventtia.com in the Domain URL field, and download the Domain Association File.
Important: Do not rename, open, or edit this file, and do not click "Register Domain" in PayPal yet.
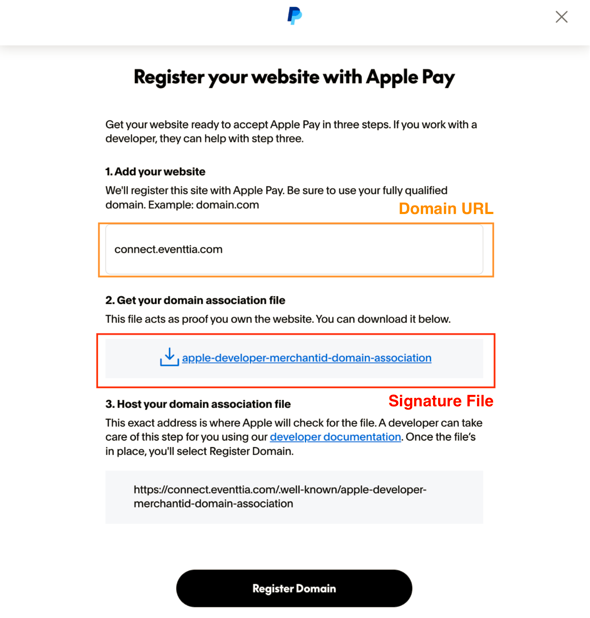
Step 2: Contact Eventtia support
Send an email or submit a support ticket to Eventtia Support (help@eventtia.com) requesting Apple Pay activation, and attach the unmodified domain association file you downloaded. Our technical team will host the file on the server for you.
Step 3: Complete registration in PayPal
Once Eventtia Support notifies you that the file has been uploaded, return to your PayPal dashboard and click Register Domain.
Your status will immediately update to Verified!