Notes: In order to use Zoom Webinar, this option must be enabled within your Zoom account plan.
How to set up activities with Zoom Meetings
- Go into Zoom's Marketplace by clicking here: https://marketplace.zoom.us/
- Sign in using your Zoom credentials
- Click on Develop >> Build App >> Server to server OAuth App and click on the create button.


- Add a short description (you can put Streaming).
- Add Eventtia as “Company Name”.
- In “Developer Contact Information” you must fill in the Zoom user information (Name and email).
- Then click “continue” again.

7. Inside the “Add feature” section you should not change any information, just click “continue” to continue.
.webp?width=670&height=490&name=Zoom6-2%20(1).webp)
- “Create a meeting for a user”
- “View all user meetings”
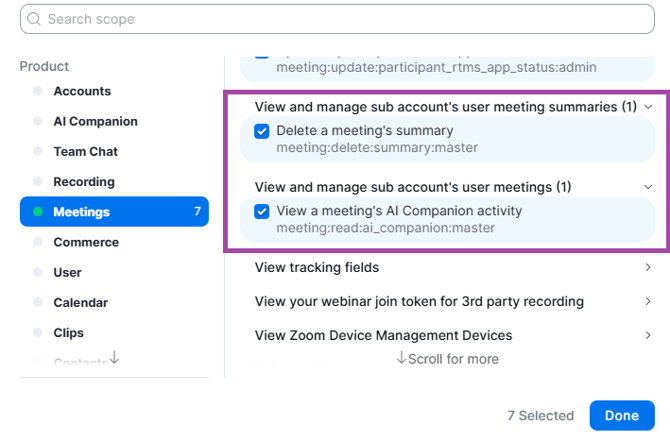
- “View and manage all user meeting summaries”
- “View and manage all user meetings”
- “View and manage sub account's user meeting summaries”
- “View and manage sub account's user meetings”
Select the permissions you wish to enable and click on “Done.” Remember that you can return at any time to edit these settings.


IMPORTANT NOTE:
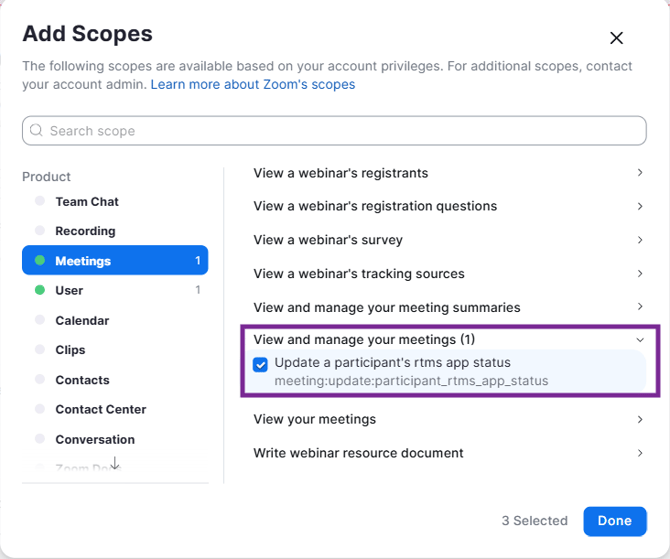
To configure Zoom Webinar, you must add an additional scope.
In the “Add scopes” section, search for and add the same permissions you configured for Meetings, but applied to Webinar. Enable the permissions and click on “Done.”
9 .Finally, in the “Activation” section, click on “Activate your app.”

Now, it is necessary to create a second application of the type “Meeting SDK”.
1. Again, look for the Build app >> General App >> Click on the “Create” button.

2. By default it will create a random name, if you want to customize it you must click on the pencil located on the upper left side, in our case we will call it “Eventtia SDk”.

3. Once created we must take into account the fields that we must complete for it to work. In the “App Credentials” section, add the address of your company's website in the “Redirect URL for OAuth” space as well as in “Add Allow List”, after adding the URL, click “continue”.

- At the end do not forget to click on “continue”. After you have enabled all the cards.

4. In the Embed section it is indispensable to enable the toggle of the meeting SDK and click on continue.

5. In the Add Scopes section, leave the default configuration, click continue.

6. To add the app you must generate the URL Authorization and click on the button.
 7. Finally it is necessary to enable the permissions.

Now, with the two applications created, it is time to configure my activities in Eventtia with Zoom Embedded in the Virtual Stage.
It is very important that you follow the instructions below thoroughly.
1. When the activity is created and embedded zoom is selected, the following data will be requested: Zoom user, Zoom server to zoom server account id, Zoom server to server client id, Zoom server to server client secret, Zoom server to server client id, Meeting sdk client id, Meeting sdk client secret.

- Zoom user: This is the user's email address
To acquire the following information you will have to go to the Marketplace again and click on the “manage” button - Zoom server to server ID
- Zoom server to server client ID
- Zoom server to server client secret
2. Search for the “Server to server OAuth” application in type and click on the name

3. Go to the “App Credential” tab to take the Account ID, Client ID, Client secret and Client ID information.

Important Note: Under no circumstances click on “Regenerate” because it damages the activities previously created.
4. Again, click on “Manage” to find the following fields:
- Meeting sdk client id
- Meeting sdk client secret
5. Search for the “Meeting SDK” application and click on the name
.webp?width=670&height=275&name=Zoom18%20(1).webp) 6. Enter the “App credentials” section and you will get the Client ID and Client Secret.
6. Enter the “App credentials” section and you will get the Client ID and Client Secret.

Important Note: Do not click on “Regenerate” for any reason because it damages all the previous configuration.
You are now ready to create your activities with Zoom embedded in Eventtia!
We suggest integrating your Zoom accounts with Eventtia to make the process easier next time.
Setting up your Zoom account integration with Eventtia
- Go to the user module
- Go to the “Account Integrations” tab.
- Click on Zoom and create a new one
- Enter all the information obtained in the previous steps (Zoom user, Zoom server-to-server account id, Zoom server-to-server client id, Zoom server-to-server client id, Zoom server-to-server client secret, Meeting sdk client id, Meeting sdk client secret)

6. "Once you have filled in the data, click on 'Save'."
- Use Server-to-Server OAuth and Meeting SDK
- Zoom Integrations
7. Choose the “Video embedded in virtual stage” option and in the “zoom integration” field select the one you want to use for this activity.
